This is Part Four of a four-part series on Adobe Experience Manager as a Cloud Service. Part One provided an overview of AEM Cloud Service as compared with AEM 6.5. Part Two covered the unique operations and deployment features of AEM Cloud Service. Part Three described how AEM development changes under AEM Cloud Service, along with lessons learned using AEM Cloud Service to date. This part describes the tools that Adobe provides for migrating an existing AEM installation to AEM Cloud Service.
Having read the previous parts in this blog series, hopefully you are excited about using AEM Cloud Service. But what if you have an existing AEM installation on AEM Managed Services or being hosted on-premise? What does migration to AEM Cloud Service look like and how much effort is involved? When AEM Cloud Service was first launched, you were more or less on your own; however since then Adobe has provided a number of tools to help with this.
Cloud Acceleration Manager
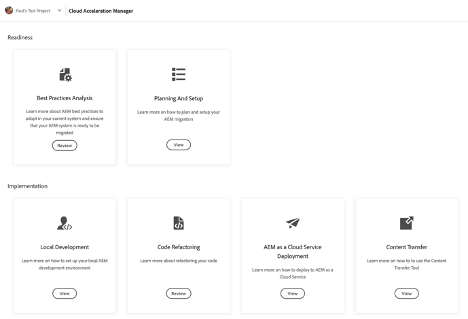
Your starting point for any AEM Cloud Service migration project is Cloud Acceleration Manager – a cloud-based tool that walks you through the process of preparing for a migration to AEM Cloud Service. It divides the project into three phases:
- Readiness Phase – where you review your existing AEM website and codebase to understand what might need to change and start the planning process for the migration.
- Implementation Phase – where you set up a local AEM instance, refactor your code, set up your deployment pipelines, and transfer content.
- Go Live Phase – where you launch your migrated site on AEM Cloud Service.
Once you create a new project in Cloud Acceleration Manager, you see a tiled interface that shows all the phases and steps in the migration process, as shown below.

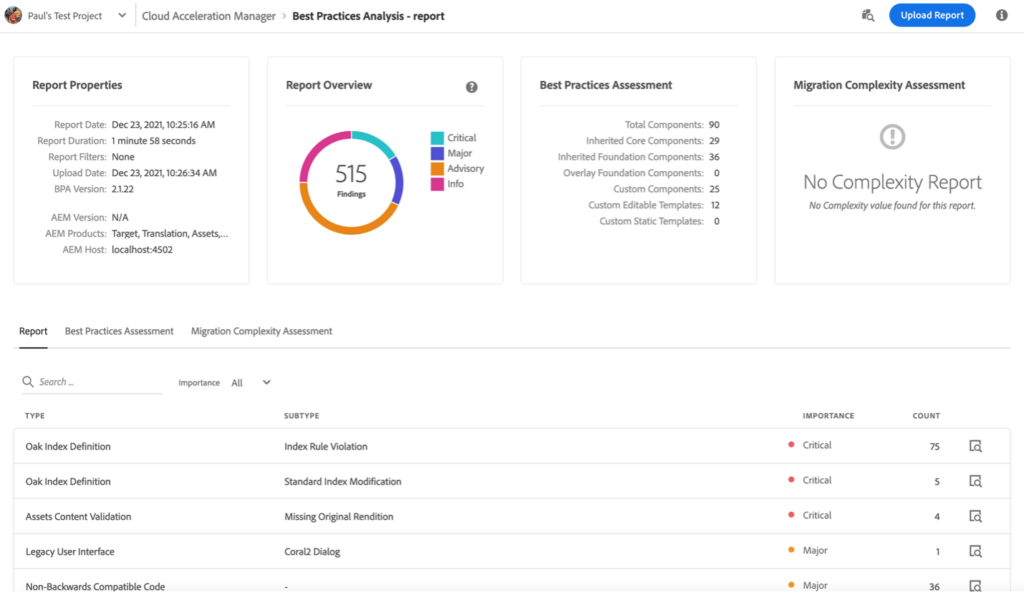
Cloud Acceleration Manager essentially acts as a launching point for tools and documentation that will assist you during your migration project. For example, the Best Practices Analyzer tile prompts you to install and run the Best Practices Analyzer package in the Author instance for your existing AEM installation, then upload the results file into Cloud Acceleration Manager in order to generate a dashboard showing a summary of the Best Practices Analyzer findings and an assessment of the complexity of your migration. The Planning and Setup tile on the other hand launches a popup that walks you through the provisioning process and discovery activities, with links to the relevant pages in the online documentation.
AEM Cloud Service Migration Tools
Adobe provides several tools that will be of use during your migration project.
Transition Tools
- Best Practices Analyzer – this is a tool that extends the Pattern Detector tool that was used in the past for identifying potential issues in AEM 6.x upgrades. It runs in an Authoring instance and creates a report that assesses areas of code/configuration that are not following AEM Cloud Service best practices and may need to be refactored.
- Content Transfer Tool – this tool can be used to migrate Sites + Assets content and users + groups to AEM Cloud Service. It works by extracting content from the source AEM environment to a temporary cloud storage area known as a “migration set”. Migration sets can then be ingested into a target AEM Cloud Service instance.
Refactoring Tools
- Repository Modernizer – transforms the Maven project into an AEM Cloud Service-compatible project.
- Index Converter – migrates custom Oak index definitions to AEM Cloud Service.
- Asset Workflow Migration Tool – migrates asset processing workflows to AEM Cloud Service.
- Dispatcher Converter – converts Dispatcher configurations to be compatible with AEM Cloud Service.
- AEM Modernization Tools – convert legacy AEM features e.g. static templates to editable templates, classic UI to touch UI, foundation components to core components, etc.
The extent to which you will need to use each tool will depend on the AEM features that you are using, how long ago your AEM project was created, and the degree to which best practices have been followed (bearing in mind that best practices have evolved over time and what was once best practice can become a legacy method of implementation). A couple of tools deserve a deeper dive: the Best Practices Analyzer and the Content Transfer Tool.
Best Practices Analyzer
The Best Practices Analyzer package can be downloaded from the Adobe Software Distribution site and installed into an AEM instance via Package Manager. This adds a new tile to the Operations tab in the Tools section of AEM for accessing the Best Practices Analyzer. The tool executes a series of checks against the AEM instance and generates a report consisting of an overview section that provides a summary of the findings along with a series of sections exploring a particular topic in more detail. The report can be browsed directly within AEM or exported in CSV format and then imported into Cloud Acceleration Manager; this generates a dashboard that is more compact and easier to navigate than the equivalent AEM report interface.

Report items typically contain links to either a more detailed explanation of the potential issue in the AEM Pattern Detection documentation or to the relevant page in the general AEM documentation. We recommend that you review each report item carefully to determine whether it represents a problem for your specific project and construct a list of required fixes (maintained in a tool such as Atlassian Jira). Deep AEM expertise is needed to interpret some of the findings and Adobe partners such as Sirius can assist with this. As you work through fixing issues, the Best Practices Analyzer report can be regenerated and uploaded to Cloud Acceleration Manager to update the dashboard. This also makes available a View Trendline option that displays graphs of the count of overall findings over time and the number of custom components and templates over time. The graphs offer filters by importance level and component/template category respectively.
Content Transfer Tool
The Content Transfer Tool was developed by Adobe to make it easier for customers to migrate from an on-premise or AMS-hosted AEM environment to AEM Cloud Service. There are a number of steps involved in using the tool:
- First check the prerequisites to ensure that they are all satisfied for your environment. In particular, it only support AEM 6.3 and above, and there are a number of important size limitations for the segment store, overall repository and Lucene index size.
- Review the guidelines, best practices and important considerations regarding the use of the tool.
- Download the tool from the Adobe Software Distribution site and install it in the source AEM Author instance. This will add a new Content Migration tile to the Operations tab in the Tools section of AEM. Clicking on the tile reveals two further tiles: Content Transfer and User Mapping.
The User Mapping tool is used to map users in the source AEM instance to users in the target AEM Cloud Service instance. This step must be performed before content is transferred and is necessary because in AEM Cloud Service, content authors and admins are set up via Adobe IMS and their user accounts in AEM include references to their IMS ids. The steps involved in executing the tool are as follows:
- Ensure that AEM users have been provisioned in the Adobe IMS account for your organization (preferably via integration with Azure AD as described in Part Two of this blog series).
- Configure the User Management API in the Adobe I/O developer console.
- Set up the User Mapping tool in the source AEM instance using the access credentials created in step 2.
- Run the User Mapping tool in the source AEM instance. This will look up Adobe IMS for each user in the source AEM instance and populate the user’s IMS id in the user record in the JCR so that the user is correctly linked to their Adobe IMS account once content is transferred to the target AEM Cloud Service instance.
Once the User Mapping tool has been run, you can create a migration set, initiate the first content extraction from the source AEM Author instance and content ingestion into AEM Cloud Service. Note the following:
- If your source AEM environment is hosted by AMS or your “on-premise” AEM environment uses cloud storage (Amazon S3 or Azure Blob Store) then you can accelerate content extraction and ingestion by using Microsoft’s AzCopy tool as described here.
- Once the initial extraction and ingestion is performed, it is possible to do one or more “Top-up” extractions/ingestions that only transfer the delta of content that has been modified since the most recent extraction. Doing frequent top-up extractions will help to reduce the content freeze period prior to going live on AEM Cloud Service.
- After each extraction and each ingestion, you should check the logs to see if there were any errors.
- It is also possible to use the Content Transfer Tool to transfer content to Publish instances; however if you do so then you need to create a new migration set that is extracted from one of the source Publish instances as the Content Transfer Tool will transfer both published and unpublished content from the source instance regardless of the type of target instance. It’s unclear however as to why you would need to do this given that (as noted in Part One of this blog series) in AEM Cloud Service the Author and Publish tiers share the same blob store – presumably one could use content distribution to publish the migrated content from the Author to Publish tiers instead with minimal performance overhead.
We hope you enjoyed this walk through AEM Cloud Service features, constraints and lessons learned. We remain excited about the product and the rate at which new features are being rolled out by Adobe. Check back for future articles covering the new features as they become available!


Comments are closed.